/
Configuring MS Windows 2000/XP/2003/Vista/7/8/8.1
Configuring MS Windows 2000/XP/2003/Vista/7/8/8.1
If you install and run Xlpd on a Windows PC with a printer attached, the PC becomes a printer server. And if you are sitting on another networked PC and want to process remote UNIX/Linux print job. You can configure your PC to use the remote printer.
- In the Control Panel, open Printers and Faxes.
- Double-click Add a Printer. RESULT: An Add Printer Wizard opens.
- In the Local or Network(Wireless, Bluetooth) Printer page, select Local Printer, and then click Next.
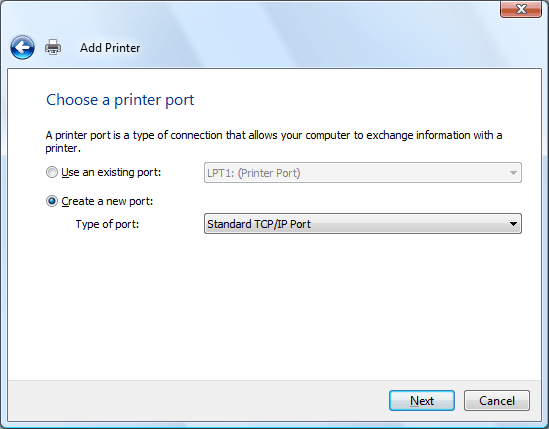
RESULT: The Choose a Printer Port step appears.
- Select Create a new port.
- In the Type of port list box, choose Standard TCP/IP Port.
- Click Next.
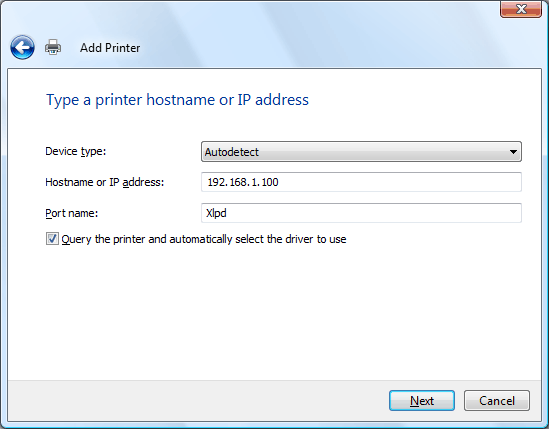
RESULT: The step of typing a printer hostname or IP address appears.
- In the Printer Name or IP Address box, enter the IP address or hostname of the PC where Xlpd is installed.
- In the Port Name box, enter any unique port name. You may use the name automatically created when the printer name or IP address is entered.
- Click Next.
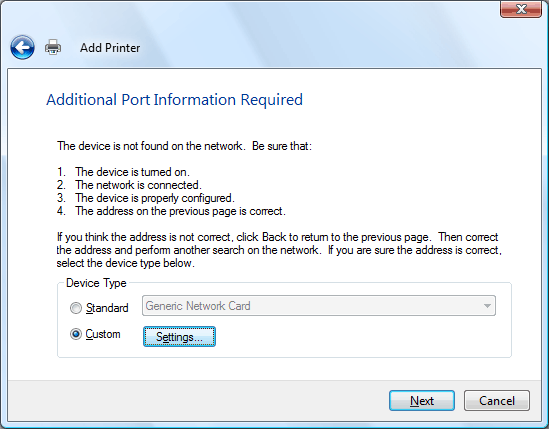
RESULT: The Additional Port Information Required step appears.
- In the Device Type area, select Custom.
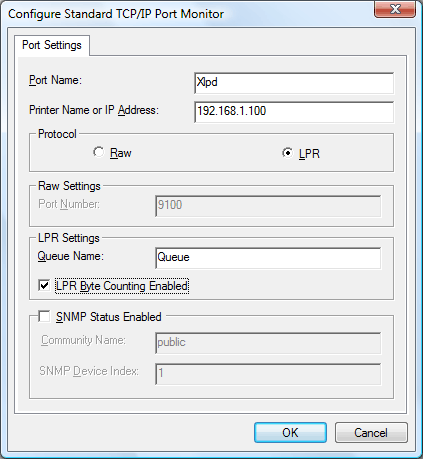
- Click Settings. RESULT: A Configure Standard TCP/IP Port Monitor dialog box opens.
- In the Protocol area, select LPR.
- In the Queue Name box, enter the queue name of Xlpd. If this name is not already registered in Xlpd and a print job is sent to Xlpd using this queue, then Xlpd will print the job using its default queue or create a new queue automatically depending on the Xlpd settings.
- Select the LPR Byte Counting Enabled check box.
- Clear the SNMP Status Enabled check box.
- Click OK.
- Click Next, and follow the instructions on the additional steps for further configuration.
Related content
Windows 2000_XP_2003_Vista_7 Printer Setup
Windows 2000_XP_2003_Vista_7 Printer Setup
More like this
Windows 2000_XP_2003_Vista_7 Printer Setup
Windows 2000_XP_2003_Vista_7 Printer Setup
More like this
Configuring MS Windows 10
Configuring MS Windows 10
More like this
Remote printer configuration: General Setup
Remote printer configuration: General Setup
More like this
General Setup
General Setup
More like this
General Setup
General Setup
More like this


