/
Remote printer configuration: Solaris
Remote printer configuration: Solaris
Run admintool at the console and follow the procedures to register a remote printer.
This section explains setup procedures for each Solaris version. For a detailed explanation on how to set up a printer for a particular Solaris version, refer to its system manual.
Solaris 2.6, 2.7, 8, 9, 10
- Run /usr/bin/admintool as root user.
- Click Browse -> Printers in the menu.
- Click Add -> Access to Printer in the Edit menu.
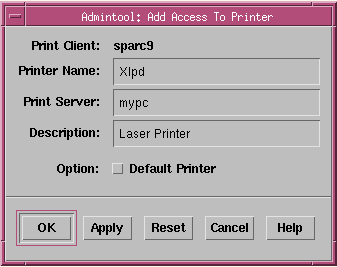
- In the print setup window, enter the followings.
- Printer Name: printer name to be used on the print command line (printer_name). This is also used as queue name. In order to use the queue registered in Xlpd, this name should be exactly match the registered queue name in Xlpd. If this name is not already registered in Xlpd and a print job is sent to Xlpd using this queue, then Xlpd will print the job using its default queue or create a new queue automatically depending on the Xlpdsettings.
- Print Server: IP address or hostname of the PC where Xlpd is installed. The IP address may not be accepted, then the hostname should be registered in /etc/hosts file as explained in General setup.
- Description: comments on printer model or other useful information. This is not used on the print command line.
- Option - Default Printer: This option must be selected if you want this printer to be the default printer for the print command. If you do not define a printer when giving the print command, system uses the default printer.
- Click OK to exit admintool.
- To print a file on Solaris system, use the following command line.
$ /usr/ucb/lpr -PPrinter_name filename
Solaris 2.5
- Run admintool as root user.
- Click Browse -> Printers in the menu.
- Click Add in the Edit menu.
- Click Access to Printer in the Add submenu.
- In the Printer Server, enter the PC's hostname or IP address.
- Select BSD.
- Restart hclnfsd or bwnfsd. # ps -ef | egrep '(bwnfsd|hclnfsd)'* $PID is a process ID of running bwnfsd or hclnfsd.
# kill -1 $PID
Solaris 2.4, Solaris 2.3
- Run admintool as root user.
- Select Printer Manager.
- Click Edit -> Add Printer in the menu.
- In the Printer Server, enter the PC's hostname or IP address.
- Select BSD.
- Restart hclnfsd or bwnfsd. # ps -ef | egrep '(bwnfsd|hclnfsd)'* $PID is a process ID of running bwnfsd or hclnfsd.
# kill -1 $PID
Printer setup in Solaris 2.x command Line
In the Queuename option, enter the name of queue registered in Xlpd. If this name is not already registered in Xlpd and a print job is sent to Xlpd using this queue, then Xlpd will print the job using its default queue or create a new queue automatically depending on the Xlpd settings.
- Login as root user.
- Identify the print server system to a bsd system with the following command.
# lpsystem -t bsd pcname - Register print queue and printer server system.
# lpadmin -p Queuename -s pcname - Begin accepting (queuing) print request on the new print queue.
# accept Queuename - Get ready to receive print request on the new print queue.
# enable Queuename - Test print queue.
# /usr/ucb/lpq -P Queuename - Test-print with the following command.
# lpr -P Queuename samplefile
Related content
Xlpd
More like this
Connection _ SERIAL
Connection _ SERIAL
More like this
Create Session
Create Session
More like this
Starting with Xstart
Starting with Xstart
More like this
Starting with XDMCP
Starting with XDMCP
More like this
