Using the OpenSSH CA (Certificate Authority) in Xshell
- Netsarang Support
- NetSarang Support
- Netsarang Support
Overview
(If you only want the quick step-by-steps, scroll down to Basic Step-by-Step Guide near the bottom of this article)
For public key authentication the public user key must be registered on the server you want to connect to and also to the user. This approach can be considered inefficient, and it can also be a burden to the server administrator. Thus, using a public key authenticated via a Certificate Authority (CA) can be a superior solution. OpenSSH provides simple certificate generation and an associated CA infrastructure. Xshell can utilize OpenSSH CAs to connect to remote UNIX/Linux servers. The following guide will show how you can use the CA feature of OpenSSH in Xshell.
If you use an authenticated key, even if the SSH server's host key changes, if the corresponding host key is signed, the key will be recognized as the host key of the same server in the SSH client. This is useful if you need to make frequent changes to the host key. Also, it grants the server administrator the ability to set and manage expiration dates of private keys as well as the ability to revoke private keys used by users outright. Users can connect to the server only with public keys authenticated by the authentication server.
IMPORTANT: To use this feature in Version 6, the OpenSSH Certificate Authority option must be enabled in Help => Experimental Features.
Host Key Authentication
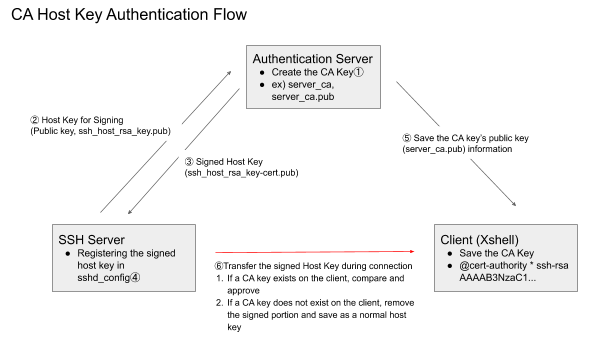
Creating a Signing Key①
Run the following command on the certificate creation server. Create a password when prompted. You will need to enter this password to authenticate the key later.
$ ssh-keygen -f server_ca
Generating public/private rsa key pair.
Enter passphrase (empty for no passphrase):
Enter same passphrase again:
Your identification has been saved in server_ca.
Your public key has been saved in server_ca.pub.
The key fingerprint is:
SHA256:wkoynUi5rXkMQXcNrpFmOWh+JbONIOCxeWv8WOxUbm4 root@uby
The key's randomart image is:
+---[RSA 2048]----+
|... . oo |
|o.++ = . |
|.+B.X o. |
| =oXo&o |
| B+X++oS |
| .X*.o. |
| o.+o E |
| . . |
| |
+----[SHA256]-----+
In our example, we created an rsa server_ca key to be used for authentication. If you'd like to use a non-rsa formatted key, use the -t option to specify the desired key format.
Confirm that the authentication key pair has been created.
$ ls
server_ca server_ca.pub
Signing the Host Key
If the host key to be signed is not from the authentication server, use the scp command to bring the host key from the appropriate server. Keep in mind that only root has read access to the SSH server host key.
Get the remote server's host key to be signed②:
# scp root@host.netsarang.com:/etc/ssh/ssh_host_rsa_key.pub .
Use the Signing Key to sign the host key:
# ssh-keygen -s server_ca -I key_id -h -n host.netsarang.com -V +52w ssh_host_rsa_key.pub
Signed host key ssh_host_rsa_key-cert.pub: id "key_id" serial 0 for host.netsarang.com...Option Explanations
s: Name of the Signing Key.
I: Name used for logging purposes.
h: Indicates that what you are signing is a host key.
n: Name of the SSH server that will use the Signing Host Key. You can use commas to list multiple servers. SSH clients must utilize one of these names. If this value is omitted, then you can use it on any SSH server.
V: Certificate validity period. The example above has specified 52 weeks (1 year).
Copy the signed host key of the remote server to the applicable remote server③. The location in which it's saved must be specified in the sshd_config:
# scp ssh_host_rsa_key-cert.pub root@host.netsarang.com:/etc/ssh/
Once the steps above are completed, the host key and the authenticated host key which were copied over are no longer needed. You can delete them:
# rm ssh_host_rsa_key.pub ssh_host_rsa_key-cert.pub
Configuring the Signed Host Key
Required SSH Server Settings
Edit the following file on the SSH server. You must have root privileges:
# vi /etc/ssh/sshd_config
Locate the HostCertificate line (if it does not exist, create it) and enter the name of the signed host key created in the step above④. An authenticated host key file is a host key file which was first authenticated on an authentication server and then copied over.
HostCertificate /etc/ssh/ssh_host_rsa_key-cert.pub
After saving, use the following command to restart the SSH Daemon.
# service ssh restart
Required Xshell Settings
- Use Notepad, etc. to create a ca_keys file where you stored the host key information
Copy the contents of the authentication file Signing Public Key (server_ca.pub) from the authentication server.
# cat ~/server_ca.pub
ssh-rsa AAAAB3NzaC1yc2EAAAADAQABAAABAQCxC+gikReZlWEnZhKkGzhcNeRD3dKh0L1opw4/LQJcUPfRj07E3am
bJfKhX/G4gfrKZ/ju0nanbq+XViNA4cpTIJq6xVk1uVvnQVOi09p4SIyqffahO9S+GxGj8apv7GkailNyY
voMYordMbIx8UVxtcTR5AeWZMAXJM6GdIyRkKxH0/Zm1r9tsVPraaMOsKc+8isjJilwiQAhxdWVqvojPmX
WE6V1R4E0wNgiHOZ+Wc72nfHh0oivZC4/i3JuZVH7kIDb+ugbsL8zFfauDevuxWeJVWn8r8SduMUVTMCzlqZKlhWb4SNCfv4j7DolKZ+KcQLbAfwybVr3Jy5dSl root@authAdd the above copied contents to the ca_keys file⑤. Now, add @cert-authority and domain restriction information in front of the public key information and then save the file.
@cert-authority *.netsarang.com ssh-rsa AAAAB3NzaC1yc2EAAAADAQABAAABAQCxC+gikReZlWEnZhKkGzhcNeRD3dKh0L1opw4/LQJcUPfRj07E3am
bJfKhX/G4gfrKZ/ju0nanbq+XViNA4cpTIJq6xVk1uVvnQVOi09p4SIyqffahO9S+GxGj8apv7GkailNyY
voMYordMbIx8UVxtcTR5AeWZMAXJM6GdIyRkKxH0/Zm1r9tsVPraaMOsKc+8isjJilwiQAhxdWVqvojPmXWE6V1R
4E0wNgiHOZ+Wc72nfHh0oivZC4/i3JuZVH7kIDb+ugbsL8zFfauDevuxWeJVWn8r8SduMUVTMCzlqZKlhWb4SNCfv4j7DolKZ+KcQLbAfwybVr3Jy5dSl root@auth- Confirm⑥.
When the host key is not authenticated and there is no information regarding the applicable host, you should see:
When the host key is authenticated:
The above prompt will not appear and the user authentication process proceeds immediately.
User Key Authentication

Creating a Signing Key①
In order to sign the user keys in the authentication server, we need to first create a Signing Key set:
# ssh-keygen -f users_ca |
Create a password when prompted. You will need this password when using this key to sign other keys.
In our example, we created an rsa server_ca key to be used for authentication. If you'd like to use a non-rsa formatted key, use the -t option to specify the desired key format.
SSH Server Settings
From the Signing Key set we created in the authentication server above, copy the public key to the SSH server②. You must have root privileges for the SSH server.
# scp users_ca.pub root@host.netsarang.com:/etc/ssh/
In the SSH server, modify the SSH daemon config file, sshd_config. You must have root privileges:
# vi /etc/ssh/sshd_config
Add the following information under the HostCertificate line that you applied during host authentication③. The users_ca.pub file is the file you copied over in Step 1.
TrustedUserCAKeys /etc/ssh/users_ca.pub
Restart the SSH service daemon.
# service ssh restart
User Key Signature
- Create a key pair to be signed in Xshell's New User Key Wizard④.
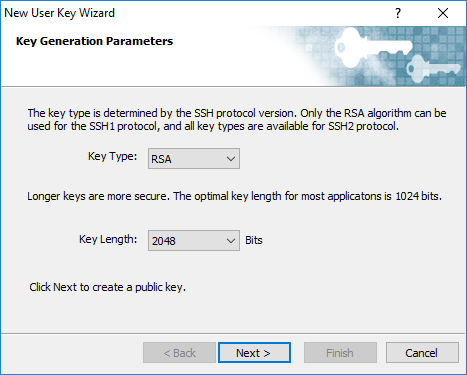

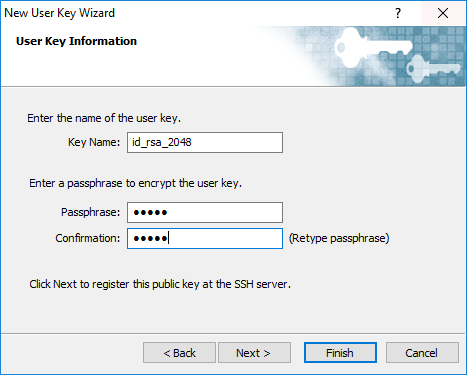
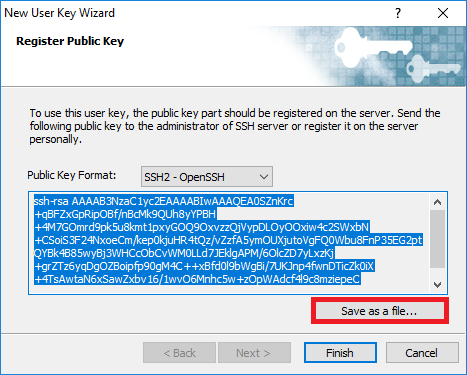
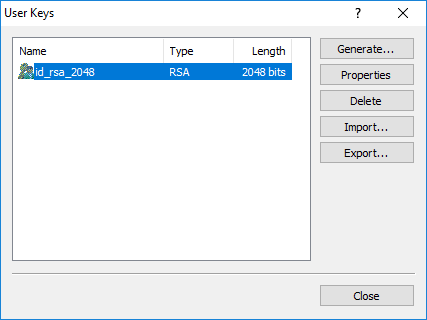
During the process of creating a user key, the public key is stored as a separate file. The public key can be verified at any time using Xshell's User Key Manager.
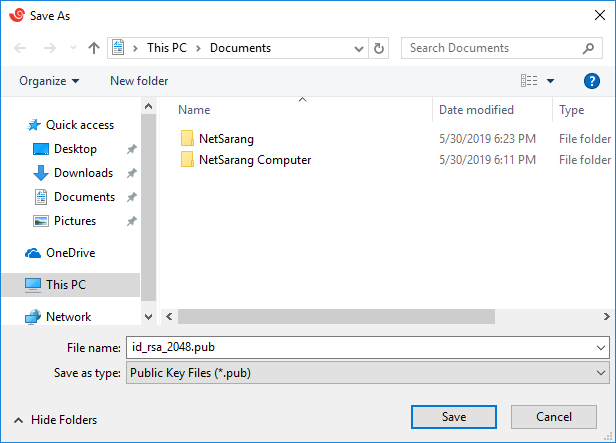
- Copy over the public key you saved above to the signing server⑤. Remember, the required file is the public key file, id_rsa_2048.pub, not the private key file, id_rsa_2048.
Use the users_ca file to sign the key. The process is similar to signing a host key, but since this is a user key, you won't use the -h parameter. In the command below, the "username1,username2" after the -n parameter are SSH server's usernames. You can list the usernames you want to use when connecting with the signed key. Unlike the host key signing process, if you leave this value blank, you will not be able to login as any user on the SSH server with the above user keys. This value must be specified.
$ ssh-keygen -s users_ca -I key_id -n username1,username2,... -V +52w id_rsa_2048.pub
Enter passphrase:
Signed user key id_rsa_2048-cert.pub: id "key_id" serial 0 for username1,username2,... valid from 2019-01-31T09:23:00 to 2020-01-30T09:24:30
$ ls id_rsa*
id_rsa_2048-cert.pub id_rsa_2048.pubWhen prompted to enter the password, enter the password you created when creating the users_ca file. Confirm that a signed file, id_rsa_2048-cert.pub, has been created.
- Copy the signed id_rsa_2048-cert.pub file to the Xshell UserKeys folder where the id_rsa_2048.pub file was located⑥:
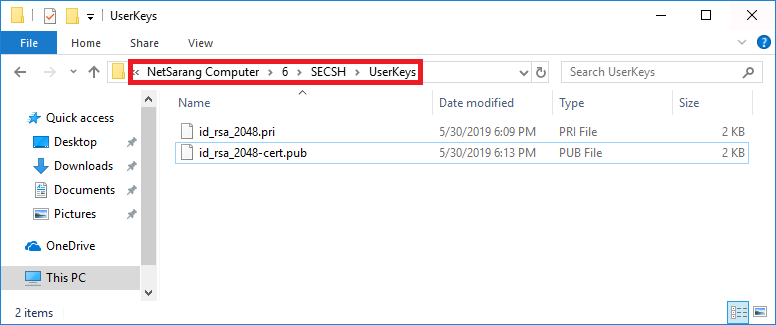
Alternatively, after downloading the signed file to your PC, you can simply drag and drop it into Xshell's Local Shell and it will automatically be copied into the above folder. Confirm
Confirm that the user you want logging into the SSH server does not have public key information:$ hostname
host
$ id
uid=1001(username1) gid=1001(username1) groups=1001(username1)
$ cat ~/.ssh/authorized_keys => Nothing about the public key.
$From Xshell, make an SSH connection to the SSH server.

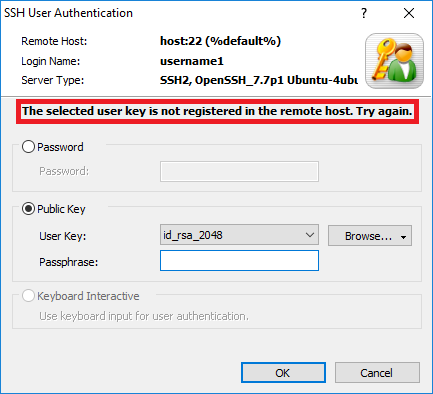
If the user key is not authenticated, you will see:
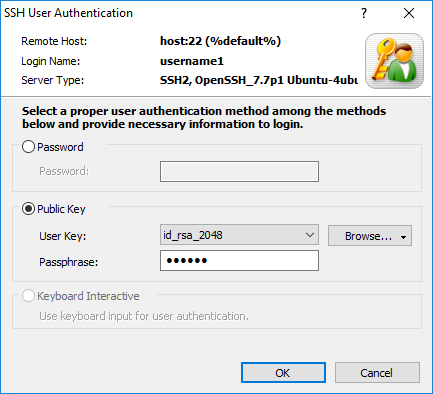
If the user key is authenticated:
Even if the public key was not registered on the SSH server, you can still login by entering the key password of the SSH client's private key (id_rsa_2048). Connections made by the users (username1,username2,...) entered after the -n parameter when signing the public key can login without registering the public key.
Basic Step-by-Step Guide
Host Authentication
Create the Signing Key in the CA server①
$ ssh-keygen -f server_ca
Transfer the SSH server's host key to be signed to the CA server②:
# scp root@host.netsarang.com:/etc/ssh/ssh_host_rsa_key.pub .
Use in the Signing Key in the CA server to sign the host key:
# ssh-keygen -s server_ca -I key_id -h -n host.netsarang.com -V +52w ssh_host_rsa_key.pub
Copy the signed host key of the remote server to the applicable remote server③:
# scp ssh_host_rsa_key-cert.pub root@centy.netsarang.com:/etc/ssh/
Required SSH Server Settings
Specify the signed host key in the sshd_config's HostCertificate line④:
HostCertificate /etc/ssh/ssh_host_rsa_key-cert.pub
After saving, use the following command to restart the SSH Daemon.
# service ssh restart
Required Xshell Settings
- Use Notepad, etc. to create a ca_keys file where you stored the host key information.
Copy the contents of the authentication file Signing Public Key (server_ca.pub) from the authentication server and paste it into the ca_keys file⑤. Now, add @cert-authority and domain restriction information in front of the public key information and then save the file.
@cert-authority *.netsarang.com ssh-rsa AAAAB3NzaC1yc2EAAAADAQABAAABAQCxC+gikReZlWEnZhKkGzhcNeRD3dKh0L1opw4/LQJcUPfRj07E3ambJ
fKhX/G4gfrKZ/ju0nanbq+XViNA4cpTIJq6xVk1uVvnQVOi09p4SIyqffahO9S+GxGj8apv7GkailNyYvoMY
ordMbIx8UVxtcTR5AeWZMAXJM6GdIyRkKxH0/Zm1r9tsVPraaMOsKc+8isjJilwiQAhxdWVqvojPmXWE6V1R
4E0wNgiHOZ+Wc72nfHh0oivZC4/i3JuZVH7kIDb+ugbsL8zFfauDevuxWeJVWn8r8SduMUVTMCzlqZKlhWb4S
NCfv4j7DolKZ+KcQLbAfwybVr3Jy5dSl root@auth
User Key Authentication
*Create the Signing Key①:*
# ssh-keygen -f users_ca
From the Signing Key set we created in the authentication server above, copy the public key to the SSH server②:
# scp users_ca.pub root@host.netsarang.com:/etc/ssh/
In the SSH server, modify the SSH daemon config file, sshd_config. Specify the users_ca.pub file for TrustedUserCAKeys:
TrustedUserCAKeys /etc/ssh/users_ca.pub
Restart the SSH service daemon:
# service ssh restart
User Key Signature
- Create a key pair to be signed in Xshell's New User Key Wizard and save the public key to a file④.
- Copy over the public key you saved above to the CA server⑤.
Use the users_ca file to sign the key.
$ ssh-keygen -s users_ca -I key_id -n username1,username2,... -V +52w id_rsa_2048.pub
- Copy the signed id_rsa_2048-cert.pub file to the Xshell UserKeys folder⑥:
- From Xshell, use the id_rsa_2048 key to make an SSH connection to the SSH server utilizing public key authentication.