Debian 10.x XDMCP Configuration
- Netsarang Support
- NetSarang Support
This guide covers how to set up an XDMCP connection for Debian 10.x using either Xmanager 6 (or lower) or Xmanager 7 Classic.
If using Xmanager 7's default X server (not Xmanager Classic), refer to the following document.
Xmanager 7 XDMCP Configurations (gdm Based)
Applicable Versions
Debian 10.02
Debian 10.03
Debian 10.04
Debian 10.05
Debian 10.06
Debian 10.07
Debian 10.08
Debian 10.09
By default, Debian 10.x uses the gdm (version 3) XDMCP daemon .
This gdm3 daemon is not compatible with XDMCP for remote access. Its reliance on Wayland (rather than the X11 protocol) will cause issues, and screen output may be scattered on the console after login.
You can resolve this issue by installing the lightdm display manager and the Xfce desktop environment rather than using gdm3 and Gnome respectively.
If using Xmanager 7, you may choose to use Gnome, but if using Xmanager 7 Classic or Xmanager 6, you must use Xfce as the user desktop environment.
Your usage environment (e.g. internet access) may be different than the one shown below, and there are always risks from making changes to the system. We encourage you to contact your system administrator if you are unaware of the risks involved.
All of the following steps are done with root privileges (or sudo command execution).
XDMCP settings
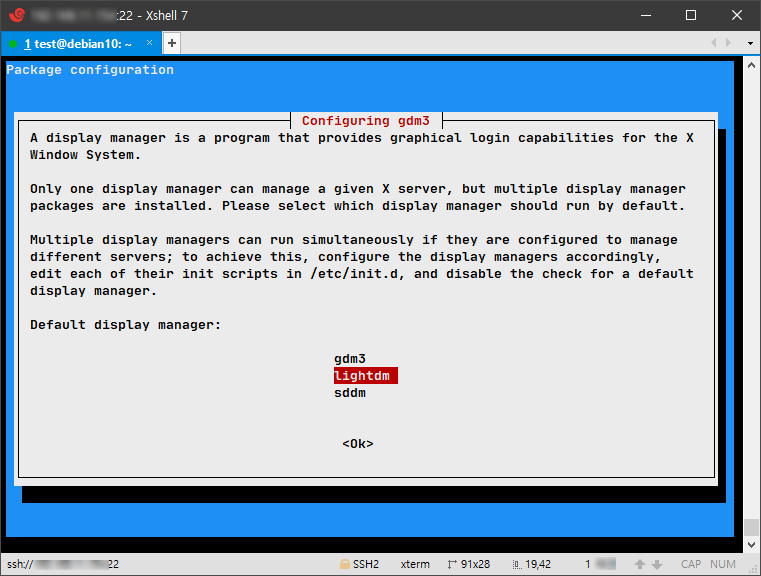
Install lightdm
$ sudo apt install lightdm
Select 'lightdm' when prompted to select a display manager.
Configure lightdm
Configure the /etc/lightdm/daemon.conf file as follows. If the file does not exist, create it.[XDMCPServer] enabled=true
Configure the Firewall
$ sudo systemctl stop ufw OR sudo systemctl stop firewalld
- Open UDP port 177 from the PC to UNIX/Linux
- Open TCP port 6000~6010 from UNIX/Linux to the PC
(For more information about firewalls, refer to the operating system's manual or request technical support from your Debian vendor. If you want to temporarily remove the firewall to investigate an issue, use the 'iptables -F' command. In Debian the iptables will not be running by default. Check whether it is running with the 'iptables -L' command.)Replace and restart the XDMCP service daemon
(The disable and enable commands are additional systemctl commands that determine whether to automatically run when the OS is started while the stop and start commands immediately stop and start the XDMCP daemon.)
$ sudo systemctl disable gdm3
$ sudo systemctl stop gdm3
$ sudo systemctl enable lightdm
$ sudo systemctl start lightdm
Configure for multiple sessions with the same user
With the default settings, you cannot create multiple XDMCP sessions with the same user. If you attempt to log in as the same user, the desktop screen will not display properly or the session will terminate. This is an issue related to the DBUS communication used in the Gnome user environment. You will need to configure the necessary settings so that each session can communicate with DBUS, or you can use a different desktop user environment such as Xfce.
Configure the /etc/X11/Xsession.d/75dbus_dbus-launch file to always set STARTDBUS to yes as shown below .
(The '75' portion in the file name above may vary by package or version)# $Id:$ # In order to activate the session bus at X session launch # simply place use-session-dbus into your /etc/X11/Xsession.options file # STARTDBUS= DBUSLAUNCH=/usr/bin/dbus-launch if has_option use-session-dbus; then if [ -z "$DBUS_SESSION_BUS_ADDRESS" ] && [ -x "$DBUSLAUNCH" ]; then STARTDBUS=yes fi fi STARTDBUS=yes if [ -n "$STARTDBUS" ]; then # Note that anything that is D-Bus-activated between here and # 95dbus_update-activation-env will not have the complete environment # set up by Xsession.d, unless the Xsession.d snippet that sets the # environment variable also calls dbus-update-activation-environment. # See <https://bugs.debian.org/cgi-bin/bugreport.cgi?bug=815503> eval $($DBUSLAUNCH --exit-with-session --sh-syntax)Create an Xmanager session
Lower versions of Xmanager may not list lightdm sessions under Xmanager's dynamic sessions. To initiate a connection in this case, you will need to create an XDMCP static session in Xmanager or enter the IP address or host name directly in the address bar
Installing Xfce as the user desktop environment
Install the new user desktop environment (Xfce)
$ sudo apt-get update
$ sudo apt-get install xfce4
Apply the new desktop environment: restart the xdmcp daemon
$ sudo systemctl restart lightdm
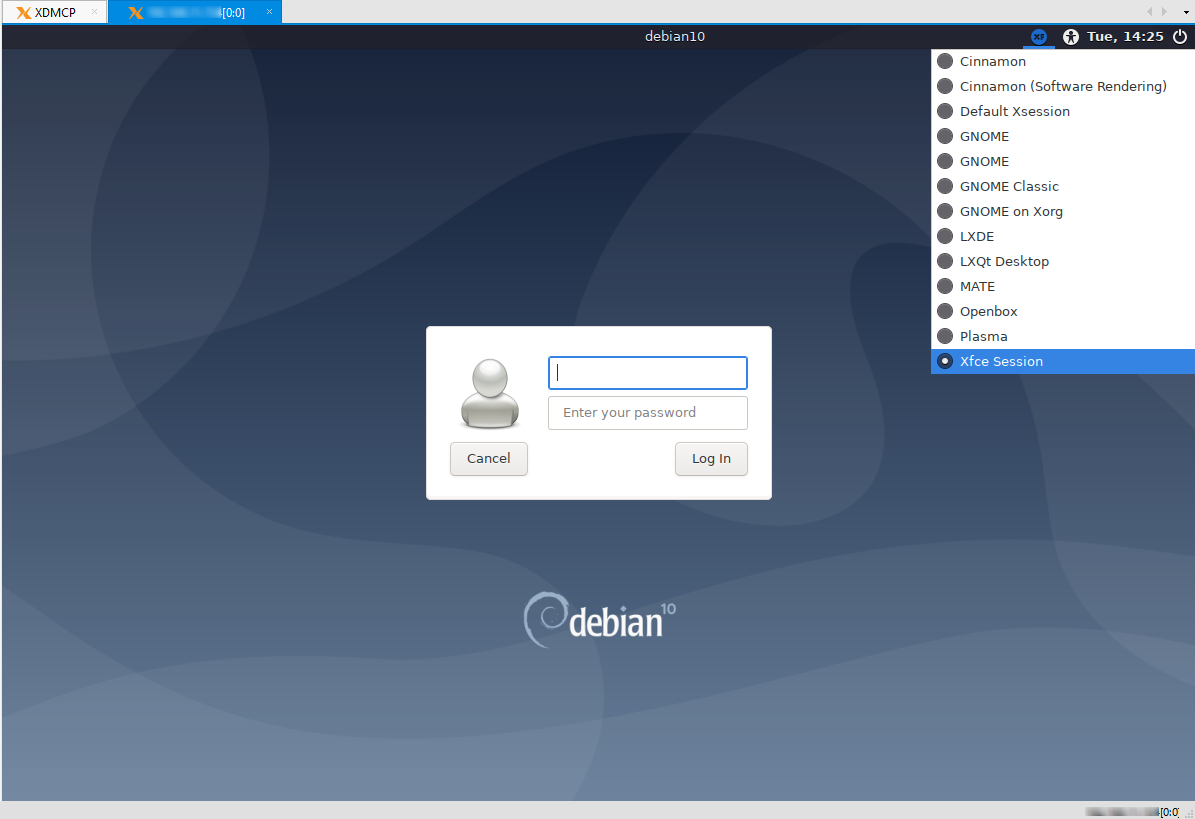
Select Xfce as the user desktop environment
After connecting with Xmanager, select the Xfce session on the login screen . Xmanager 7 supports the Gnome desktop, but using it is not recommended because of the inability to create multiple sessions with the same user. Also, Gnome requires more resources compared with Xfce.
How to check whether the service is running and working properly
Check lightdm's operation and service availability
# ps -aef |grep sbin\/lightdm|grep -v grep
root     24568     1  0 15:51 ?        00:00:00 /usr/sbin/lightdm
# netstat -anep |grep \:177[^0-9]
udp        0      0 0.0.0.0:177             0.0.0.0:*                           0          18166350   24929/lightdm
udp6       0      0 :::177                  :::*                                0          18166351   24929/lightdm => If IPv6 is not being utilized, this may not appear.
Check the Firewall
The firewall should be disabled as shown below. If you need to operate the firewall, refer to the Iptables manual and make sure that udp 177 is allowed.root@uby:~# iptables -L -n Chain INPUT (policy ACCEPT) target prot opt source destination Chain FORWARD (policy ACCEPT) target prot opt source destination Chain OUTPUT (policy ACCEPT) target prot opt source destination.
Check the Xfce installation and application